Introduction
This course assumes previous knowledge of Visual Studio and the VB.NET or C# language to create traditional desktop applications. Writing apps for the Windows Store is a different process. This chapter will present the basic workflow of Windows 8 app creation using VB or C# in Visual Studio 2012. Workflow processes include: using templates, creating the interface with XAML code, adding underlying functionality with c# or VB code, and modifying the interface to be responsive to different device view states.
- Create a new Windows Store app from a project template.
- Develop a basic interface by adding XAML controls (elements) and modifying their attributes.
- Add event handlers to controls on a page and code their functionality in the underlying VB or C# document.
- Modify the interface to respond to the different view states of a device.
- Getting Started – The Necessary Tools
- Workflow Comparison to Desktop Development
- Creating a Simple Windows Store App
- Microsoft's "Part 1: Create a "Hello, world" app (Windows Store apps using C#/VB and XAML)" is a step-by-step tutorial that teaches you about building Windows 8 Store apps.
- Watch the last 37 minutes of the "APP202: The Absolute Beginner's Guide To Building Windows 8 Apps" (1:01:28). Begin at the 24-minute for an overview of metro design principles and how they apply to Windows 8.
- Quiz
- Assignment 3A – Triangle Calculator project
Instruction
(Note: Due to the formatting limitations of this document, some code snippets presented here may include statements split on more than one line when in the code editor they should not be. E.g. literal strings (red text enclosed in quotes) must occur on one line. Make the appropriate corrections in the Visual Studio text editor.)
Microsoft Store apps may be created in a variety of ways with a variety of tools using different languages. This course focuses on using VB.NET or C# language with Visual Studio 2012. Interfaces are designed in Visual Studio using XAML (Extensible Application Markup Language) code and/or a visual layout environment to create the underlying XAML code. The controls of the Base Class Library used in the interface are vector designed and scale effectively. Their style is code based (much like using Cascading Style Sheets in an HTML document) and can be chosen or modified to meet the project's design needs.
This lesson will identify what you need to start writing an app for the Windows Store. It will also examine the workflow process and the roles of source files found in the Solution Explorer. Specifically, you will examine how to start a blank project and how to begin a project with a precoded template as a starting point.
Getting Started – The Necessary Tools
Windows 8
In this lesson, you will be using Visual Studio 2012. It is essential to understand, however, that while Visual Studio 2012 will run on a Windows 7 computer, you can only create Windows Store apps (Windows 8 apps) if it is running on a Windows 8 device. You can create a dual-boot Windows 8 partition on your hard drive if you prefer to keep Windows 7 around, but will need to install Visual Studio after booting into Windows 8 to develop Windows Store apps. Likewise, you will need to be executing Visual Studio 2012 while booted into Windows 8.
Visual Studio 2012
Windows 8 apps can only be created with Visual Studio 2012. If you are running a previous version, such as Visual Studio 2010 or one the 2010 express editions, you need to upgrade to the 2012 version. Visual Studio 2012 can be installed to coexist with a previous version. There are multiple versions of Visual Studio 2012, with varying capabilities and features.
- Visual Studio 2012 Professional ($499)
The most basic full version of VS2012. It provides access to multiple languages and the IDE. It also provides the ability to text and run your apps within the environment. This is suitable for individuals or small teams. - Visual Studio 2012 Professional with MSDN ($1,199)
This version is similar to Visual Studio 2012 Professional. This version, however, also includes a subscription to the Microsoft Developer Network that provides developer blogs, code snippets, examples, additional documentation, and direct access to the cloud (Windows Azure) and Windows Store for deployment. - Visual Studio 2012 Test Professional with MSDN ($2,169)
This version is similar to Professional with MSDN, but adds capabilities to allow noncoding team members to test and provide feedback. - Visual Studio 2012 Premium with MSDN ($6,199)
This version adds features for agile collaboration in larger teams. - Visual Studio 2012 Ultimate with MSDN ($13,299)
This version is designed for large development teams and large projects.
The screen shots and videos in this course were created with the Premium edition. If your school has a Microsoft DreamSpark account, you may be eligible to download the Premium edition free of charge. However, Microsoft does provide a free, feature-less, Express edition available that is sufficient for this course. There are several Express versions aimed at specific types of products. The one for this course is:
- Visual Studio Express 2012 for Windows 8 (Free)
This version includes the ability to create Windows 8 apps with either VB or C#, as well as C++, HTML, and JavaScript.
For more details on the various versions or to download either a trial or the free Express version, see Visual Studio.
Other Tools
Microsoft Blend for Visual Studio is an optional tool for creating user interfaces. The current version is designed for creating interfaces visually with underlying XAML code. It was previously known as Microsoft Expression Blend and was used by developers creating Windows Presentation Foundation (WPF), Silverlight, and Windows Phone applications. Much of the Blend tools/environment is now built into Visual Studio 2012. Blend does provide additional functionality for creating animations and altering visual states. Since software is very visual and creative, good vector drawing and bitmap painting software packages may also prove helpful. Adobe Illustrator (vectors) and Adobe Photoshop (bitmaps) are the industry leaders in both categories. For more information, visit the Adobe website. Vector graphics that are created using VB/C# Windows 8 apps should be saved in XAML format. There are various third-party solutions for saving an Illustrator or SVG format file into XAML.
Other Environments
There other development environments and techniques to create Windows Store apps beside C# and VB.NET. Within the Visual Studio 2012 environment, C++ code can be used with XAML, or apps may be developed with a combination of HTML5 (HyperText Markup Language), Cascading Style Sheets (CSS) for interface development, and JavaScript for the underlying functional code. More information on these approaches can be found at the Microsoft Developer Center website.
Windows Store Developer Account
You will need a Microsoft developer account to distribute your Windows 8 app to the Windows Store. You can use your existing Microsoft Store ID that you setup Windows 8 with or that you use to connect to the store to download apps and just add the developer license. The annual cost is $49, but students in the DreamSpark program may be eligible for a free account. To purchase a license, visit the Windows Store registration website.
Workflow Comparison to Desktop Development
This course assumes a working knowledge of creating VB.NET or C# traditional desktop applications using the Visual Studio IDE (Integrated Development Environment). While you may have used a previous version of Visual Studio such as 2010, you likely created applications by doing the following:
- Using a workflow of designing the interface by adding controls (also referred to as elements) with the visual tools of the toolbox
- Modifying properties of those controls to achieve your UI design
- Writing code to respond (handle) events associated with the various controls
- Testing your application in the IDE
- Making modifications (debugging) to the interface and code as necessary
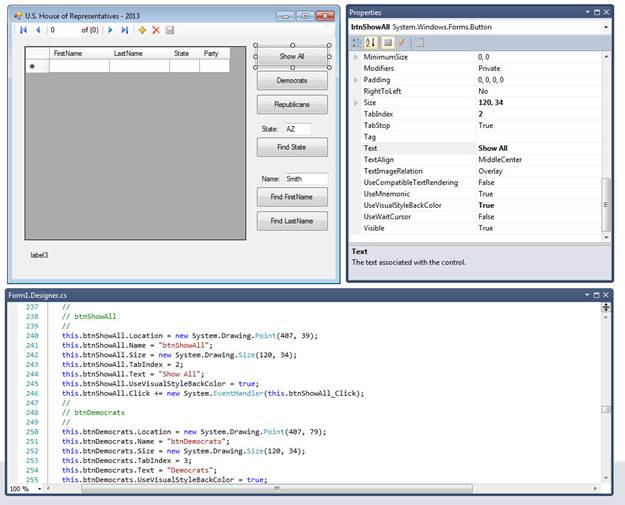
Figure 1 – In the Visual Studio 2010 IDE, a form created with visual tools (top left) and modified via the Properties panel (top right) was creating C# or VB code for the form's layout when working with Windows Forms. The Form1.Designer.cs file (bottom) specified all the controls and their properties of the form.
Developing Windows Store apps follows the same workflow. The workflow is not all that different for creating Windows Store apps. You will still create the interface (Toolbox + Properties panel and/or XAML code), create event handlers, code the event handlers, test and debug your project, and make changes to the interface or underlying code until the app works as you designed it to function.
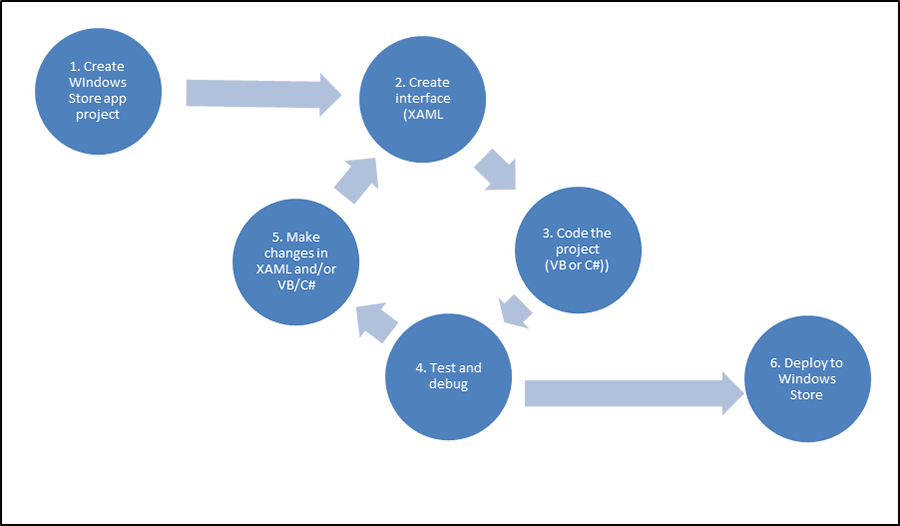
Figure 2 – The Windows Store App development cycle.
A planning stage would precede the aforementioned process. Brainstorming produces the scope of the project and features are defined, interfaces sketched out as storyboards, algorithms thought thru, pseudo-code or flowcharts created of the processes. This also includes whatever planning activities you and your development team are accustomed to—whether it is mental exercises or physical documentation.
If you have taken a VB or C# desktop application programming course, the process should already look somewhat familiar. However, the tools, terminology, and code have changed a bit.
Interface Design with XAML
Desktop application forms were defined by underlying VB or C# code. This code predominantly was built for you while you added controls visually to the form and manipulated their properties using the Properties panel. For Windows 8 apps, the interface (Page design) is composed of XAML code (eXtensible Application Markup Language), pronounced "zammel." While the underlying code can be built by interacting with the Toolbox, visual Designer panel, and the Properties panel, most developers prefer to build (or at least manipulate) the interface directly in the XAML code. You will use the Designer panel in building the project of this lesson, but will also work directly with the underlying XAML code for the app's page. In addition, you can style the controls using a dictionary resource of standard styles. Styles may be modified for a project and new styles can also be created. Writing XAML code is very similar to writing HTML or XML code – utilizing opening and closing tags and specifying attributes within the tags or tag structure.
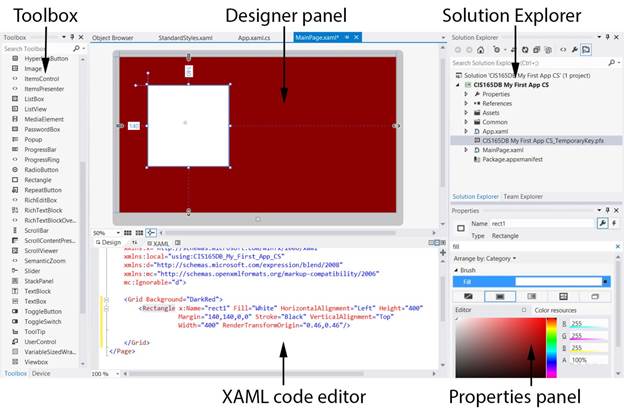
Figure 3 – Visual Studio 2012 screenshot of interface development panels. Note the underlying XAML code defining the controls and their attributes as seen in the Designer panel.
Pages Rather than Forms
While you created Forms for the application's programs on the desktop side, in Windows 8, you will create pages for the Windows Store apps. Just as you could have multiple forms in a desktop application, you can have multiple pages in a project and navigate between them. You can begin with a blank page or start working from a template of multiple interactive pages. There are seven types of page templates that can be added to any project.

Figure 4 – The Add New Item dialog of a Windows 8 C# (or VB) project reveals seven different pages that can be added to a project.
Descriptions and thumbnail images of each of the seven types of pages are presented in the following table.
Seven Types of Page Templates
| Page Type | Descriptions | Thumbnail Image |
|---|---|---|
| Blank Page | This is a blank page with a <Canvas> control; there are no prebuilt capabilities. This is the starting page if you begin with a Blank App (XAML) project template. |  |
| Basic Page | This is similar to the Blank Page, but has a prebuilt Back button and page title, recommended margins and styles, and a structure for handling various view states. This is not part of a project template, but can be added to a Blank template as a new starting point. |  |
| Grouped Items Page | This is one of three pages included in the Grid App project template. This is the starting page containing grid view of grouped data items (broadest view). Tapping or clicking on a group navigates to the Group Detail Page for the data of that group. | 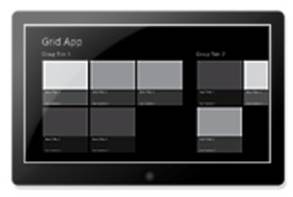 |
| Group Detail Page | This is the middle detail view of a Grid App project template. This presents the data of a single group consisting of multiple items. On the left, there is information about the group as a whole. On the right, there are the various items of the group with additional (broad) info. | 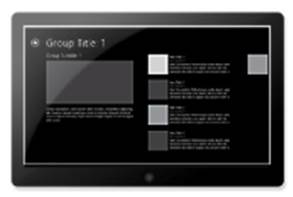 |
| Item Detail Page | This is the detailed view of items in a Grid App project. It presents detailed information about a specific item and is typically accessed by clicking an item listing in a Group Detail Page. Thus, the flow of drilling down from general to specific is from Grouped Items Page (broad) to Group Details Page (middle) to Item Detail Page (narrow). | 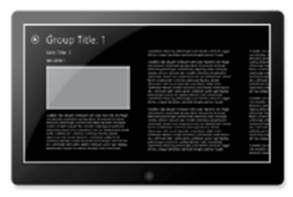 |
| Items Page | This is the starting point of the Split App project template. It presents groups of items at the broadest level. | 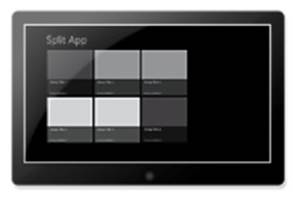 |
| Split Page | This is the detailed page of the Split App project template. It presents the broadest level of dual-layer data in a page split with two elements. The left side has a ListView control of items with details about the selected item presented on the right side. | 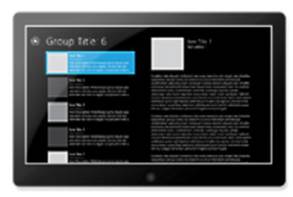 |
Responsive Pages to Various View States
One of the other key differences is the need to have a fluid design that is responsive to the various form factors and view states. Each page may be viewed in various states of the device: portrait mode, landscape mode, full screen view, filled view, and snapped view. For each page, you need to have the layout respond to changing views. You can accomplish this using storyboards with animations that manipulate the elements on a page, which changes visibility or size and location.
Unnamed Control Instances are OK
All controls had names on the desktop-application, programming side with Windows Forms. Visual Studio assigned a name to every instance of a control, albeit they were not the most meaningful – such as Button1, Textbox3, or Label7. Those names often were changed to be more meaningful, especially when they were being referenced in code. Adding a new XAML control to a page does not mean the control was named. In fact, event handlers can be assigned to an unnamed control, because the event handling function is referenced in the XAML code. For instance:
XAML Code
<Button HorizontalAlignment="Left" Margin="100,100,0,0"
VerticalAlignment="Top" Background="Red" Height="60" Width="60"
Tapped="ChangeColor" />
Creates a button that responds to a tap or click by executing the ChangeColor function in the underlying VB (or C#) code for the page:
VB Code:
Private Sub ChangeColor(Sender As Object, e As TappedRoutedEventArgs)
'Do something
End Sub
Note the lack of a Handles… event handler reference. The VB structure for a Windows 8 app now looks much more like that of C# event-handling functions.
Naming controls with meaningful names is still highly recommended. This task can be accomplished via the Properties panel or by adding an x:Name="myName" attribute reference in the control's XAML definition.
XAML Code snippet:
<Button x:Name="btnMakeRed" HorizontalAlignment="Left" Margin="100,100,0,0"
VerticalAlignment="Top" Background="Red" Height="60" Width="60"
Tapped="ChangeColor" />
Creating a Simple Windows Store App
There are several steps involved with creating an app for the Windows Store. To be successful, you must learn how to perform the following tasks:
- Creating a new project
- Choosing a template
- Examining source code files
- Creating the interface
- Writing code
- Testing and debugging the app
- Modifying the app
- Handling visual states
To get started, launch Visual Studio 2012 from Windows 8 Start Screen or Windows 8 Desktop— either way it will launch in desktop mode.
Review "Creating a Simple Windows Store App" section in the Lesson 3 Guide for detailed information and examples.
Practice
- Modify the app built in this lesson by adding three more buttons to change rectangle colors to red, green, and blue. You may change the design as you wish, but make sure the functionality is fully accessible in all four VisualStates.
- Microsoft's "Part 1: Create a "Hello, world" app (Windows Store apps using C#/VB and XAML)" is a step-by-step tutorial that teaches you about building Windows 8 Store apps. Work through the project and test it. Modify the project by creating alternate layouts of the Filled, Snapped, and Portrait view states.
Assignments
Complete the following:
- Quiz
- Assignment 3A – Triangle Calculator project
Summary
Windows Store apps may be started from three different templates, but additional pages or other items are easily added to each project. Each project consists of multiple source code documents, including: logo graphics, pages comprised of XAML code with underlying functionality provided by VB or C# code, and style sheets.
Pages are comprised of XAML controls that may be added visually to the Designer panel from the Toolbox or by entering tags into the page's XAML code. Some control attributes may be altered visually in the Designer panel, such as location and size, but all attributes may be changed in the Properties panel or by adding attribute/value pairs in the control's tag or tag structure.
Likewise, event-handling functions may be specified in the Properties panel or added to the XAML code. The functions are coded in the underlying .xaml.cs or .xaml.vb document. Apps may be tested in Visual Studio directly on the development device, a connected remote device, or the built-in simulator. The simulator allows for testing the app using both touch and mouse events, as well as testing different resolutions.
Windows Store apps need to respond to different view states (landscape, portrait, filled, and snapped). These view states are dictated by storyboard animations setup within a <VisualStateManager.VisualStateGroups> block of code. Animations may include altering the attributes of controls to better fit the screen or hiding/showing different controls.
Summary Video
Watch the last 37 minutes of the "APP202: The Absolute Beginner's Guide To Building Windows 8 Apps" video from Channel 9 by Ben Gracewood and Ian Randall (1:01:28). Begin at the 24-minute for an overview of metro design principles and how they apply to Windows 8.

This work is created by the National Information Security and Geospatial Technologies Consortium (NISGTC), and except where otherwise noted, is licensed under the Creative Commons Attribution 3.0 Unported License